As the garden is dying down and preparing for winter, I've been out collecting my open pollinated bean seeds to plant in following years, and wanted to share this easy tutorial.
As with all seed saving, be sure that you are only collecting seeds from plants that have been grown from open-pollinated (heirloom) varieties. Any plant that is not open-pollinated, or hybrid, will not produce seed true to the parent type. If you are unsure, check the seed packaging. Most hybrid seeds are not labelled, but most open-pollinated seeds are.
Bean flowers are perfect, meaning that they self pollinate and produce without the help of bees. This makes them one of the easiest seeds to save, because you do not need to worry about cross contamination or hand pollination. The only thing you need to do is allow the beans to grow to full size, dry out, and harvest.
Most green beans are picked while young and tender, when the seeds are very small. If you are planning on harvesting seeds, you will need to allow them to grow until the seeds are fully developed. At this point the beans are not good for eating; they become tough and stringy. Once they have reached this point, simply allow the pod to dry out, and you can harvest the seeds. Here's how:
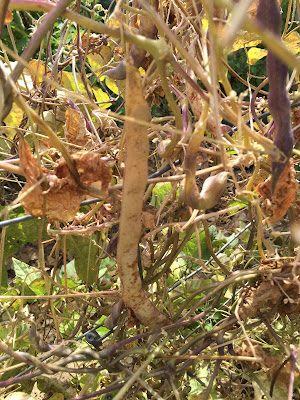
You will know it is time to start saving seeds when your plants begin to die down and dry out. This is what my purple podded pole beans look like. You can see that the tops are beginning to dry out, but the bottom portion of the trellis is still green.

Most likely your bean pods will be at varying stages. I purposefully left several beans on the vine to allow them to fully mature. Seeds are ready to harvest when they have reached full size, and the pods are completely dry. Pods will be hard to the touch, feel like paper, and are not pliable. If you try to bend or squeeze a mature pod it will crack and break. Often times the color of the bean pod itself changes to a pale yellow/brown color. If pods are pliable and soft, they are not ready for seed harvesting. Leave them on the vine until completely dried. Here you can see a completely dried bean pod (yellow color, in the center), compared to one that is not quiet ready (purple pod in top right corner).
Collect all pods that are dried and ready for seed harvest. Another way to verify they are ready is by shaking the pod. The seeds should be dry enough that they rattle inside of the pod.

To harvest, simply break or crack open the pods and remove the seeds. Bean seeds vary in color based on variety; you might notice a slightly purple hue from these ones.

The beans themselves should be completely dried. You should not be able to bend or indent the seed with a fingernail. You can test seeds by smashing one with a hammer. Dried bean seeds should shatter, rather than 'smash'. If your bean seeds are not sufficiently dried, leave them in a single layer on a paper plate until they are.
As with all seed saving, be sure that you are only collecting seeds from plants that have been grown from open-pollinated (heirloom) varieties. Any plant that is not open-pollinated, or hybrid, will not produce seed true to the parent type. If you are unsure, check the seed packaging. Most hybrid seeds are not labelled, but most open-pollinated seeds are.
Bean flowers are perfect, meaning that they self pollinate and produce without the help of bees. This makes them one of the easiest seeds to save, because you do not need to worry about cross contamination or hand pollination. The only thing you need to do is allow the beans to grow to full size, dry out, and harvest.
Most green beans are picked while young and tender, when the seeds are very small. If you are planning on harvesting seeds, you will need to allow them to grow until the seeds are fully developed. At this point the beans are not good for eating; they become tough and stringy. Once they have reached this point, simply allow the pod to dry out, and you can harvest the seeds. Here's how:
You will know it is time to start saving seeds when your plants begin to die down and dry out. This is what my purple podded pole beans look like. You can see that the tops are beginning to dry out, but the bottom portion of the trellis is still green.

Most likely your bean pods will be at varying stages. I purposefully left several beans on the vine to allow them to fully mature. Seeds are ready to harvest when they have reached full size, and the pods are completely dry. Pods will be hard to the touch, feel like paper, and are not pliable. If you try to bend or squeeze a mature pod it will crack and break. Often times the color of the bean pod itself changes to a pale yellow/brown color. If pods are pliable and soft, they are not ready for seed harvesting. Leave them on the vine until completely dried. Here you can see a completely dried bean pod (yellow color, in the center), compared to one that is not quiet ready (purple pod in top right corner).

Collect all pods that are dried and ready for seed harvest. Another way to verify they are ready is by shaking the pod. The seeds should be dry enough that they rattle inside of the pod.

To harvest, simply break or crack open the pods and remove the seeds. Bean seeds vary in color based on variety; you might notice a slightly purple hue from these ones.

The beans themselves should be completely dried. You should not be able to bend or indent the seed with a fingernail. You can test seeds by smashing one with a hammer. Dried bean seeds should shatter, rather than 'smash'. If your bean seeds are not sufficiently dried, leave them in a single layer on a paper plate until they are.
Each week I check the vines for additional pods that are dried and ready to harvest. The longer the plants sit, the more seed I am able to save. However, sometimes rain will prohibit your pods from drying out completely. If so, you can use the following method (this works particularly well with bush bean plants).

Pull entire plant from the ground and hang upside down in a shed or garage to allow bean pods to dry completely. I taped each plant to a beam in my shed for several weeks, until the plants were ready.

From here you will do the same thing as described with the pole beans above. Collect your dried bean pods.

Depending on what varieties you plant, you don't need to worry too much about keeping pods from different plants separated, since the beans themselves will for the most part be distinguishable. For example, here are some Indian Woman Yellow Bush Beans:

And here are Pioneer Pink Eyed Beans:

If you plant different varieties that have similar looking seeds, you will need to keep them separated.
Collect all of your dried beans, separate into varieties, and store. I keep mine in small plastic zip-close bags with a handwritten or printed label, stating the variety and year.

Saving your own seed is easy, fun and extremely cost effective! Choose to buy open-pollinated seeds once, rather than buying hybrid year after year! You'll be surprised at how easy and rewarding seed saving can be!
Thank you for this great post. This was the first tutorial that addressed what to do if the weather was prohibiting the seeds from drying out. I am in zone 3 and needed to save seeds before the snows began.
ReplyDelete